
Once Proxmox is installed will need to create an additional Linux bridge on the node.
Proxmox typically configures a default bridge named ‘vmbr0’ upon installation on a VPS. The next step involves creating a second Linux bridge, which will be referred to as ‘vmbr1’
Create a “Linux Bridge”
Open the Network Configuration
To create the Linux bridge click on the “Datacenter”,then select your Proxmox server from the list.Navigate to the “System” tab and click on “Network”.
Create New Linux Bridge
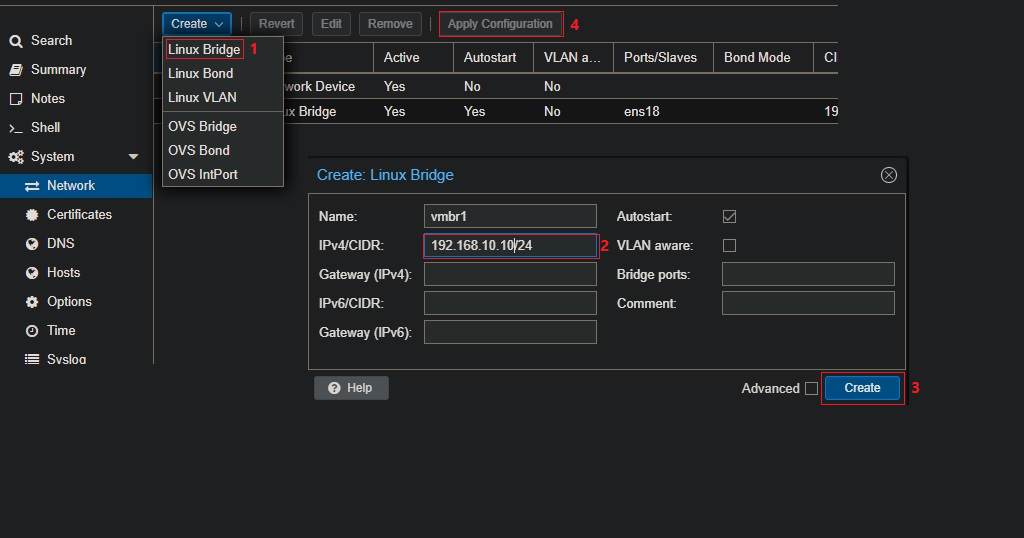
To add a new bridge, click on the ‘Create’ button, usually found at the top right corner of the network configuration section, and select ‘Linux Bridge’.
Configure the Linux Bridge:
Enter a name for your new bridge, typically ‘vmbr1’.
Assign an IP address (192.168.10.10/24) and leave the rest empty.
Click “Create” to add the new bridge.May need to apply the configuration changes for them to take effect. This can be done by clicking the ‘Apply Configuration’ button at the top right corner of the network configuration page.
Editing Proxmox Network Configuration File
Editing the Proxmox network configuration file is a straightforward process that can be accomplished either via SSH or through the Proxmox GUI.
Accessing the Network Configuration File
First, you’ll need to access the Shell. This can be done either through SSH or directly via the Proxmox GUI. Once you’re in the Shell, open the network configuration file using a text editor like nano. To do this, enter the following command:
sudo nano /etc/network/interfacesUnderstanding the Interface Configuration
Upon opening the file, you’ll see the existing network configuration. It typically includes the main Linux bridge with the public IP. Here’s an example of what you might see:
iface lo inet loopback

iface ens18 inet manual

auto vmbr0
iface vmbr0 inet static
        address 193.24.209.100/24 #Static VPS IP
        gateway 193.24.209.1      #Static VPS Gateway IP
        bridge-ports ens18
        bridge-stp off
        bridge-fd 0
Adding a Second Linux Bridge
Now, it’s time to add the second Linux bridge, named “vmbr1”. This bridge will handle the internal network. Append the following configuration to the file:
auto vmbr1
iface vmbr1 inet static
address 192.168.10.10/24 #Local IP
netmask 255.255.255.0
bridge_ports none
bridge_stp off
bridge_fd 0
Implementing NAT and IP Forwarding
To enable Network Address Translation (NAT) and IP forwarding, add these commands under the vmbr1 configuration:
post-up echo 1 > /proc/sys/net/ipv4/ip_forward
post-up   iptables -t nat -A POSTROUTING -s '192.168.10.0/24' -o vmbr0 -j MASQUERADE
post-down iptables -t nat -D POSTROUTING -s '192.168.10.0/24' -o vmbr0 -j MASQUERADE
These commands are crucial for allowing virtual machines on the 192.168.10.0/24 network to communicate with the outside world through vmbr0.
Finalizing the Configuration
After adding these configurations, save and exit the editor. If you’re using nano, this can be done by pressing CTRL + X, followed by Y to confirm the changes, and finally Enter to save.
Assigning the New Linux Bridge to Your VM
Whether you’re setting up a new virtual machine (VM) or configuring an existing one, the next step is to assign the newly created Linux bridge, vmbr1, to it. Here’s how you can seamlessly integrate your VM with the new network settings.
For a New or Existing VM
- Accessing VM Settings:
- If you’re creating a new VM, follow the usual setup process in Proxmox.
- For an existing VM, navigate to the Proxmox main interface, select your VM, and go to the ‘System’ tab.
- Configuring Network Device:
- Within the Hardware section, find the ‘Network Device’ setting. Click to edit this setting.
- In the ‘Hardware’ section, find the ‘Network Device’ setting and click to edit.
- Select “vmbr1” from the bridge dropdown menu to assign the VM to the new bridge.
- Important: Change the network model to ‘Intel E1000’. This step is essential for ensuring compatibility and performance, particularly for certain operating systems like Windows.
- Saving the Configuration:
- Once you have selected
vmbr1, press ‘OK’ to save your changes. This ensures that your VM is now connected to the correct network bridge.
- Once you have selected
Setting up Network Inside the VM
In this guide, we will use a Windows Server 2022 as an example, but the process should be similar for other operating systems.
- Accessing Network Settings in Windows Server 2022:
- Start your VM and log in to your Windows Server 2022.
- Open the ‘Network & Internet’ settings from the Control Panel or the Start Menu.
- Assigning the IP Address:
- Navigate to the adapter settings linked to the Proxmox bridge (it will typically be the only active network adapter).
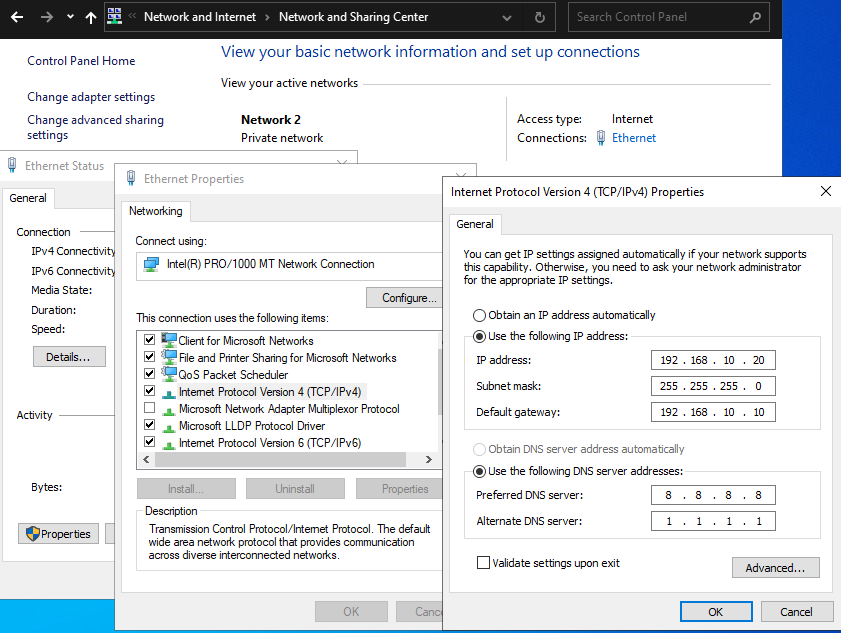
- Go to the properties of this network adapter.
- Select ‘Internet Protocol Version 4 (TCP/IPv4)’ and click ‘Properties’.
- Assign the static IP address, 192.168.10.20. Fill in the subnet mask, 255.255.255.0, gateway 192.168.10.10 and DNS 8.8.8.8 , 1.1.1.1
- Finalizing the VM Network Configuration:
- After entering the IP information, click ‘OK’ to save your settings.
- Your Windows Server VM is now configured to communicate through the
vmbr1bridge, allowing it to interact with other devices on this network segment.
Remember to restart your network service or reboot the Proxmox server for the changes to take effect. This will ensure that your virtual machines can utilize the new network bridge and communicate effectively.